


Tutorial Description
Platform : Adobe Photoshop CS+
Difficulty : Beginner
Author : Vebyo Arson
Download Source Files

In this Quick Tip tutorial, I will demonstrate how to add a cool style to photo captions by creating a frosted glass-like text bar almost like Windows aero effect that can improve the look of your photos or designs.
Step 1
Open up any image in Photoshop. I used a forest photo. You can use a similar one if you like. Otherwise, any image will do. Unlock the background layer by Double-Clicking on the layer, name it "Forest".

Step 2
Create a new layer (Ctrl + Shift + N) on top of the "Forest" layer, and call it "Frosted Bar". Using the Rectangle Marquee tool (M) making sure you’re on the Frosted Bar layer, drag out a selection of the bar size that you desire, making sure it touches both sides of the document. The placement of the bar is up to you; in my case I am putting it down at the bottom of the image as shown.

Step 3
Fill in the selection using the Paint Bucket tool (G) with white (#FFFFFF) and deselect the current selection (Ctrl + D).

Step 4
Apply the following layer styles to the "Frosted Bar" Layer (Double Click on "Frosted Bar" layer).
Blending Options: Custom – Set Fill Opacity to 20% under Advanced Blending


Step 5
We will need to edit our original image so it’s best to make a duplicate copy so we can always reverse it. So with the "Forest" layer selected duplicate it (Ctrl + J). With the "Forest copy" layer selected, load the frosted bar selection again by Ctrl + clicking the Frosted Bar layer icon. Apply a Gaussian Blur (Filter > Blur > Gaussian Blur) input 8 as the radius and click OK.

Step 6
With the basis of our frosted bar created, we can now apply highlights. Create a new layer (Ctrl + Shift + N) on top of the Frosted Bar layer, and call it "Highlights". Load the Frosted Bar selection again if you have not got it already selected, and select the Brush tool (B). Using a large soft brush (500px, no hardness and White as the colour: #FFFFFF) paint highlights in the middle of the bar, both on top and below (as seen below), finally drop the opacity down of the "Highlight" layer to 60%.


Step 7
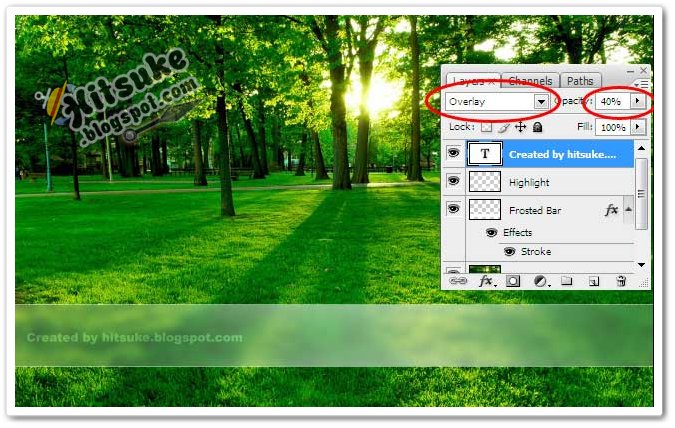
Our final step is to add text. Using the Text tool (T) add whatever text you want within the bar at whatever size suits you (In our case out font size is 24px). Drop the opacity down to 40% on the text, and change the blending mode to Overlay, and that’s it.
Final Result
Take a look at the final image. Hope you enjoyed the tutorial!


No comments:
Post a Comment